

Product Featured
Model: Focusrite Vocaster OneRelease Price: $199.99 (contact by livechat, phone or email for ETA)
Released: June 2022
Model: Focusrite Vocaster Two
Release Price: $299.99 (contact by livechat, phone or email for ETA)
Released: June 2022
This Focusrite Vocaster One & Two review was produced by David Michael at The Passionate DJ Podcast and Mo Dingo
[/alert]Introducing the Audio Interface for Podcasters: Focusrite Vocaster One and Two (Transcript)
Vocaster is a new line of audio interfaces from Focusrite, the same company that makes enormously-popular external soundcard hardware such as the Scarlett series.
On the surface, the devices are very simple. Looking at the top of the Vocaster Two, all you see is a large center gain knob, and two headphones volume knobs. Around the back, two mic pre-amps, and a series of unassuming ports.

The Vocaster One is even simpler, sporting one knob for mic and headphones each. In either case, the Vocaster is perfect for someone needing to record clean vocals, take calls, and receive audio input from within your computer.
It’s only once you start to dig into the Vocaster’s features, design, and driver software that you really begin to understand its purpose. It has an analog phone connection for taking guests and will output audio to them without their own voice (to reduce echo). The Vocaster Two even has a two-way Bluetooth connection, making it easy to take calls or source audio.
In today’s review, we will explore Vocaster One and Vocaster Two in great and gory detail. We’ll explore both the software and the hardware, and talk about who it is (and isn’t) for.
First Impressions
The first thing we did after unboxing our Vocaster Two, was to use it to record some video content, using its onboard Camera Output.
This was easy to accomplish, without even following any instructions. Simply connect the Vocaster to power with its USB-C port, connect the camera to the Vocaster using a TRRS cable, adjust your mic gain, and voila: nice, clean stereo audio from the included mic preamps.

The top of the unit lights up as soon as you power it on, giving you a visual indication of what’s happening (e.g. volume levels, whether you’re connected to Bluetooth, and whether you’ve enabled phantom power for your mics).
One thing we appreciate is the built-in headphones jacks: one each for host and guest, in the case of the Vocaster Two. We often rely on a portable recorder for capturing high-quality audio “in the field”, but it’s frustrating to not have a way to check or monitor sound without an external amplifier.
The Vocaster has a somewhat rugged appearance. Everything seems designed to prevent dust and dirt from getting into the buttons and spinny-bits. It’s just heavy enough to stay put on a table, but lightweight enough to carry around.
Using The Vocaster Hardware
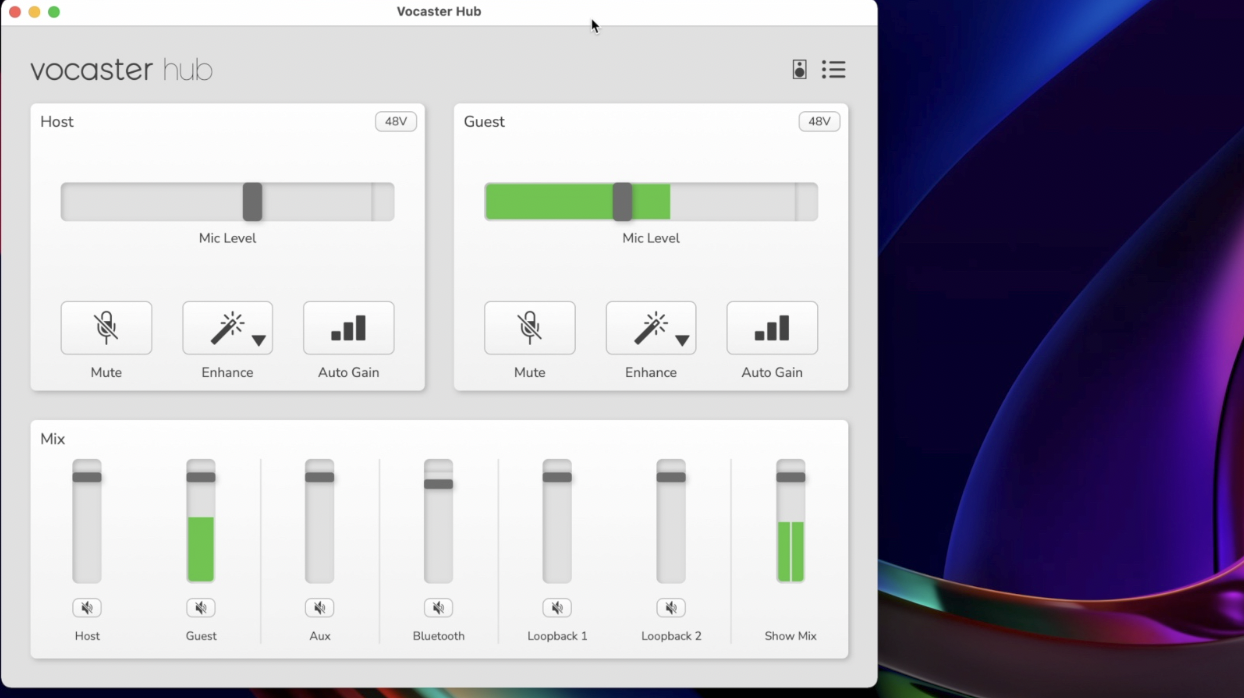
The controls on top of the device are clear and easy to use. You have a volume adjustment for your headphones (and your guest’s, in the case of Vocaster Two), and you have a single gain knob. You can select which mic you’re adjusting by selecting “Host” or “Guest” at the bottom.
By holding the mic select button down for a few seconds, it will engage an Auto-Gain mode. A countdown timer shows up while you talk for 15 seconds or so, and it selects an appropriate level for your voice. There’s also a handy Mute button for each mic. My experience was that the auto-gain was a bit conservative, and I found myself turning it up just slightly. Of course, this was probably intentional to reduce the noise floor for newer podcasters, which is an understandable choice.
The Vocaster also provides some vocal enhancement, should you choose to use it, just tap the Magic Wand button and it will cycle between four different audio presets (Clean, Warm, Bright, Radio). You can find audio examples of each of these in the video review, above.
On the back, you have a pair of ¼” stereo outputs for connecting monitors, your XLR preamps, your phone and camera analog connections, and a 48V button in case your mic requires phantom power. The Two also has a Bluetooth pairing button
Using the Vocaster Software
Upon installation, you’re guided through the process of installing Vocaster Hub – control and monitoring software. This allows you to control all the basic hardware functions on the top of the unit (such as mic gain, or audio presets) and gives you a basic mixing board
After installing Vocaster Hub, it will guide you through the process of updating its firmware. It’s then recommended that you set the Vocaster as your main audio device within Windows or Mac OS. Then, it’s just a matter of configuring your favorite recording software to work with the Vocaster’s many inputs. In the video above, we cover three different examples, which we’ll briefly cover here.
Firstly, the Vocaster ships with recording software called Hindenburg. Problematic naming aside, this software seemed very capable and up to the task. If you’ve used any multi-track recording software, you’ll feel at home here. Even if you haven’t, video tutorials are provided. After starting up Hindenburg, a message pops up saying the Vocaster is detected. On the left, you can select the stereo input for each track (or mono, in the case of microphones) and name it. Then, record away! In our example, we created a track for the host mic, guest mic, and a stereo AUX track (for the aux input on the back). That’s all it takes to set up a four-track recording.
We then experimented with the ever-popular Audacity freeware, and indeed, it worked just fine as well. The setup was a little more complicated because Hindenburg will actually show you the name of the tracks you’re adding to your recording (e.g. “Aux L/R”). If you don’t know them, you’ll need to refer to the manual or the section below.
Finally, we tested the Vocaster using Garageband, the iOS version. Indeed, it does work fine, even with my fairly old iPad, I was able to record all 14 simultaneous tracks without a hiccup.
Unfortunately, the usual method of using an Apple Lightning to USB 3 connector does not work with the Vocaster, even when using a high-powered fast charger, it doesn’t seem to deliver enough power, however, by plugging my iPad and the Vocaster into a powered USB hub, everything worked like a charm.
Understanding Vocaster Inputs
To use the Vocaster properly, it’s important to understand the various inputs and their purpose. Here is a basic description of the internal channels:
[Channels 1-2] Video Call
A stereo mix of all inputs, except Loopback channels. This forms a mix-minus – meaning a video guest can hear your whole show, minus themselves. Anything routed to the Loopback Channels (below) will be skipped, here.
[Channels 3-4] Show Mix
A stereo mix of all Vocaster inputs. This is a complete mix of all inputs in one stereo mixdown, making it perfect for getting a single audio recording of your entire show.
[Channel 5] Host Microphone
The Host Mic (XLR port).
[Channel 6] Guest Microphone
The Guest Mic (XLR port).
[Channels 7-8] Aux
The 3.5mm stereo auxiliary (“phone”) input is on the back. It also feeds the Vocaster’s output back to the phone, so the person on the call can hear the whole mix without their own voice (aka mix-minus). A TRRS jack cable is required for this two-way communication.
[Channels 9-10] Bluetooth
A stereo input, for any audio device, is paired to the Vocaster via Bluetooth.
Loopback Channels:
Virtual inputs which let you record audio sources from within your computer.
[Channels 11-12] Loopback 1
The signal from software fed from software playback 1-2*. Unless otherwise directed, audio playback from all applications (e.g. Chrome, Spotify, Skype) will play through this channel.
[Channels 13-14] Loopback 2
The signal from software fed from software playback 3-4*.
Software Playback Outputs
* The Vocaster driver has 2 virtual stereo outputs: Playback 1-2 and Playback 3-4.
Playback 1 (Left) and 2 (Right) contain all your applications’ audio, by default. This is because many applications don’t give a way to select audio output channels (e.g. Skype).
If an application gives control of output channels, you could instead route them to Playback 3 (Left) and 4 (Right). For example, soundboard software is used for samples or jingles. This would effectively route Skype to Loopback 1 and your soundboard app to the Loopback 2, enabling you to record your sound samples independently of your Skype call.
This is a lot to take in, but it’s much simpler than it looks. We recommend watching the video examples above to help explain
Our Conclusions
As content creators, we’re always looking for tools to help us save time, money, or footprint. For those just getting into the content creation game, the Vocaster line is spot-on.
But it’s not just for beginners. It’s great for any podcaster or solo content creator who needs really good mic preamps, and a simple way to get several audio channels to record (and therefore, edit) separately.

It’s less ideal for larger teams who record in-person, which begs the question, will there be a Vocaster Four sometime in the future? Time will tell, but we’re rooting for it.
When you look at the feature set, the price point, and the quality, the Vocaster devices are great options for beginner or veteran content creators.
- Wish List
- A second USB-C port. It isn’t very easy to use a tablet or phone setup (since you need a powered USB hub).
- More mics! A Vocaster Four in similar form-factor utilizing a breakout cable would make tons of sense.
- No “Vocaster Control” App. Would be convenient for using the device remotely and independently.
- The “Studio” Bundles don’t make sense, particularly the Vocaster Two Studio. Only one set of mic/headphones are included, meaning that you’ll have to buy a second (unmatched) set.
Your Turn
We put a lot of love into these reviews to serve you, our friends, and the global community of DJs.
If you found this useful, please support by
- Sharing this post on your socials (or texting it to another DJ who’ll benefit)
- Leaving a comment below with what you’re most excited about the Focusrite Vocaster (or why it’s still not what you’re looking for)
- Subscribing to the Passionate DJ Podcast
- And if you are looking to pick up the Focusrite Vocaster (or any other gear), consider purchasing from The DJ Hookup, who makes this possible. Ask us for below-advertised pricing and we’ll be happy to hook you up!
Looking to pick up a Focusrite Vocaster (or other dj gear)?
Let us hook you up.
Click here & ask us for discounts and best deals!
2 thoughts on “Focusrite Vocaster Review – Hands-On Deep Dive”